Can I Unhook Just Ground to Change Alternator
Your voltage or charging arrangement alarm calorie-free is on and your battery is expressionless or low because your alternator is not working. A quick voltage check at the battery terminals shows the charging system is non producing any voltage when the engine is idling. Bold the problem is a bad alternator and not a problem elsewhere such equally loose or corroded wiring connections, loose or corroded bombardment cables, or a fault in the charging control module or PCM, you need to supersede your alternator.
Replacing an alternator is not a difficult job on most vehicles. All y'all need are some basic manus wrenches or sockets to loosen the alternator mounting bolts.
To supersede your alternator, proceed as follows:

1. Disconnect your battery. NOTE: If you have a 2004 or newer vehicle, come across the related article on Battery Disconnect Precautions. Employ a battery memory saver if the modules in your vehicle would be afflicted Earlier yous disconnect the car battery.
The reason for disconnecting your battery is to prevent any shorts or grounds that might occur if you accidentally touch a battery positive wire at the alternator against anything metal. The sudden voltage surge could damage sensitive electronics in your vehicle or the wiring. At that place is NO danger of being shocked by 12 volts.

2. Remove the alternator drive belt.
On newer vehicles with a serpentine belt and automatic belt tensioner, locate the chugalug tensioner and employ a socket and long handle to rotate the tensioner. the direction you turn the tensioner will depend on how it is mounted and how the belt is routed. On vehicles where the tensioner is hard to reach, you may accept to do this from underneath the vehicle, or information technology may require using a special long handle serpentine belt tensioner tool.
NOTE: Before you remove a serpentine chugalug, await for an underhood decal that shows how the chugalug is routed. If you tin can't find such a decal, depict a motion picture of how the belt is routed, or have a digital photo so you tin can refer to it later when you put the chugalug dorsum on. The routing of some belts can exist very confusing, so make sure you know how information technology is supposed to exist routed Before you accept it off.
If your vehicle has a serpentine belt for the alternator just at that place is no automatic tensioner, utilise the aforementioned removal procedure for a V-belt (loosen the alternator pivot commodities and adjustment commodities, rotate the alternator inwards to loosen the chugalug, then remove the belt).

On older vehicles with a V-belt, loosen the alternator pivot bolt and the adjustment commodities on the alternator back up bracket. Swing the alternator inward to relieve tension on the V-belt, and then slip the belt off of the pulley.

three.Disconnect the wiring from the back of the alternator. In some instances it may be easier to disconnect the wiring after the alternator bolts take been removed and you can turn or rotate the alternator for easier access. But yous don't want to twist the wires also much, and you lot certainly don't want to let the alternator hang by its wires as doing so can easily impairment the wiring connectors or terminals. That's why nosotros recommend disconnecting the wires Before you remove the alternator.
Note: On alternators that have multiple wiring terminals or connectors on the back, pay attention to which wires adhere to which connectors. In some cases, it may be possible to reinstall the wires on the wrong terminals, preventing the alternator from functioning or mayhap dissentious information technology or other electronics in your vehicle.
 ..
.. 
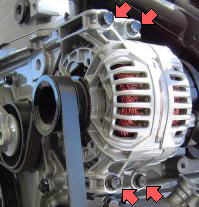
four. Unbolt and remove the alternator. Alternators usually have either 2 or 4 mounting bolts. On applications where the position of the alternator can be adjusted to tighten the belt, two bolts are standard: a large pivot bolt (which unremarkably has a hex nut on the inside end), and a smaller adjustment bolt on the alternator back up bracket. On applications where an automatic tensioner is used to maintain belt tension, the alternator is usually rigidly mounted to the engine or front embrace with four bolts.

5. Have your old alternator tested Earlier yous buy a replacement. Almost machine parts stores have an alternator demote tester, and will test your old alternator for free. Testing is a good idea to confirm the fact that the sometime unit has failed and needs to be replaced. Many alternators that are assumed to be "bad" actually examination "good" which means your charging problem is not the alternator just something else (a wiring problem, loose, damaged or corroded wiring connectors, a faulty external voltage regulator or PCM). See the related article on Alternator Diagnostics.
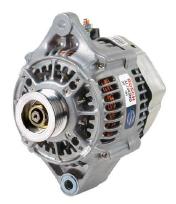
6. Purchase a new or remanufactured replacement alternator for your vehicle (or get a adept used unit of measurement that has been tested). Make sure it is the right unit of measurement for your vehicle application,. Many alternators look the same merely have different power ratings and wiring connections.

7. Make sure the replacement alternator has the same caster as your old unit of measurement. On many newer vehicles, special ane-way overide pulleys or decoupler pulleys are used to reduce noise and vibration. Cheaper replacement alternators may have just a standard pulley. It will work, merely at that place may be noticeable change in engine noise and vibration.
If the replacement alternator does not come up with a pulley already installed on it, you will have to swap the caster from your one-time alternator to the replacement unit. This may require a puller tool to remove the old caster from the alternator shaft. Applying heat with a propane torch to the caster hub may help loosen information technology for easier removal.
8. Mount the new alternator on the engine. Install all of the mounting bolts, only don't fully tighten the bolts if the alternator must be rotated to tighten a 5-belt or a serpentine chugalug that does not use an automatic tensioner.
9. Reconnect the wiring to the back of the alternator. Again, this may be easier before you mount the alternator on the engine if access to the dorsum of the alternator is express. Merely make sure all of the wires are routed correctly, and that all of the connections are clean and tight. A poor contact here may forbid the alternator from working properly.

10. Reinstall the chugalug. Sideslip the belt over the pulleys, make sure it is aligned and routed correctly, then tighten the belt if no automatic adjuster is used. This is done by carefully prying outward on the alternator housing until the chugalug is tight, and so tightening the pivot and aligning bolts. You lot may demand a helper for this step and three easily are better than 2.
On applications that have an automatic belt tensioner, you have to rotate the tensioner inward and hold information technology and then the serpentine belt can be slipped over the last pulley (which ever pulley happens to be the easiest to get at for the final step).
Finish the task by reconnecting the bombardment, starting the engine and checking charging output with a voltmeter. You should see xiii.5 to 14.5 volts if the alternator and charging system are working correctly.
Warning: Never disconnect a battery cablevision while the engine is running to "test" the alternator. Doing so can crusade loftier voltage spikes that can damage the alternator as well every bit other electronics.
Utilize a battery charger to recharge the battery. If your battery has run down, recharge it with a portable battery recharger Before y'all outset your vehicle. This will reduce the initial load on your new alternator and the hazard of overheating it.
Test the bombardment to make certain it is nevertheless good. The status of the bombardment should ever be tested if it fails to hold a charge or a charging trouble is suspected. The problem may be an former bombardment that needs to exist replaced, not a bad alternator.
Install a new serpentine chugalug or 5-belt. If your sometime belt has more than sixty,000 miles on information technology, it may be worn and should be replaced to reduce the risk of slippage. Supersede whatsoever chugalug that is cracked, damaged or contaminated with oil or grease.
Check the automatic belt tensioner. If the automatic chugalug tensioner is rusted, weak or stuck, it won't maintain the proper tension on the serpentine chugalug, allowing it to slip.
Source: https://www.aa1car.com/library/how_to_replace_alternator.htm
Post a Comment for "Can I Unhook Just Ground to Change Alternator"